
 介绍
介绍
WSL2(Windows Subsystem for Linux 2)是微软在 Windows 上提供的一个 Linux 子系统,可以在 Windows 上运行 Linux 程序,性能略好于 win 宿主机。据某国外网站测试,wsl2 的性能能达到裸机 linux 的 90%以上。可以用于日常的办公学习,在兼顾 Windows 优秀的图形化界面的同时,完成一些 linux 下的工作,比如编程、服务器搭建等等。WSL2 是一个非常好的选择。
安装
# 基本安装
如果是 Win11 用户的话,相关环境配置都是支持 WSL2 的,可以直接使用
输入wsl --update 检查更新
在Microsoft Store 下载Ubuntu系统
在开始菜单栏找到下载好的Ubuntu
wsl -l -v查看下载好的系统
# 从 c 盘迁移
这里以Ubuntu-22.04为例
-
管理员身份运行 PowerShell,执行:
wsl -l -v -
停止正在运行的 wsl
wsl --shutdown -
将需要迁移的 Linux,进行导出
wsl --export Ubuntu D:/ubuntu.tar -
导出完成之后,将原有的 Linux 卸载
wsl --unregister Ubuntu -
将导出的文件放到需要保存的地方,进行导入即可
wsl --import Ubuntu-22.04 D:\ubuntu\ D:\ubuntu.tar --version 2 -
设置默认用户
ubuntu.exe config --default-user <username>如果是
ubuntu-22.04就是ubuntu2204.exe
配置
# 个性化设置
使用 oh-my-zsh 终端界面
# 更新 package
sudo apt update && sudo apt upgrade

# 安装 zsh
sudo apt install zsh -y

# 安装 oh-my-zsh
sh -c "$(curl -fsSL https://raw.github.com/robbyrussell/oh-my-zsh/master/tools/install.sh)"


# 安装命令补全和高亮插件
git clone https://github.com/zsh-users/zsh-syntax-highlighting.git ${ZSH_CUSTOM:-~/.oh-my-zsh/custom}/plugins/zsh-syntax-highlighting
git clone https://github.com/zsh-users/zsh-autosuggestions ${ZSH_CUSTOM:-~/.oh-my-zsh/custom}/plugins/zsh-autosuggestions
git clone https://github.com/esc/conda-zsh-completion ${ZSH_CUSTOM:-~/.oh-my-zsh/custom}/plugins/conda-zsh-completion
sed -i 's/plugins=(git)/plugins=(git z sudo pip ufw docker docker-compose extract command-not-found zsh-autosuggestions zsh-syntax-highlighting conda-zsh-completion poetry)/g' ~/.zshrc

# 将 zsh 设置为默认的shell
chsh -s /bin/zsh
相关插件详情可在.zshrc中打开
plugins=(
	# git 补全
	git
	# 按 z+{模糊文件夹名称} 快速跳转
	z
	# 忘了加 sudo 的时候按两下 esc
	sudo
	pip
	ufw
	docker
	docker-compose
	# 按 x 解压任意类型压缩包
	extract
	command-not-found
	zsh-autosuggestions
	zsh-syntax-highlighting
	conda-zsh-completion
	poetry
	)
输入source .zshrc使配置生效
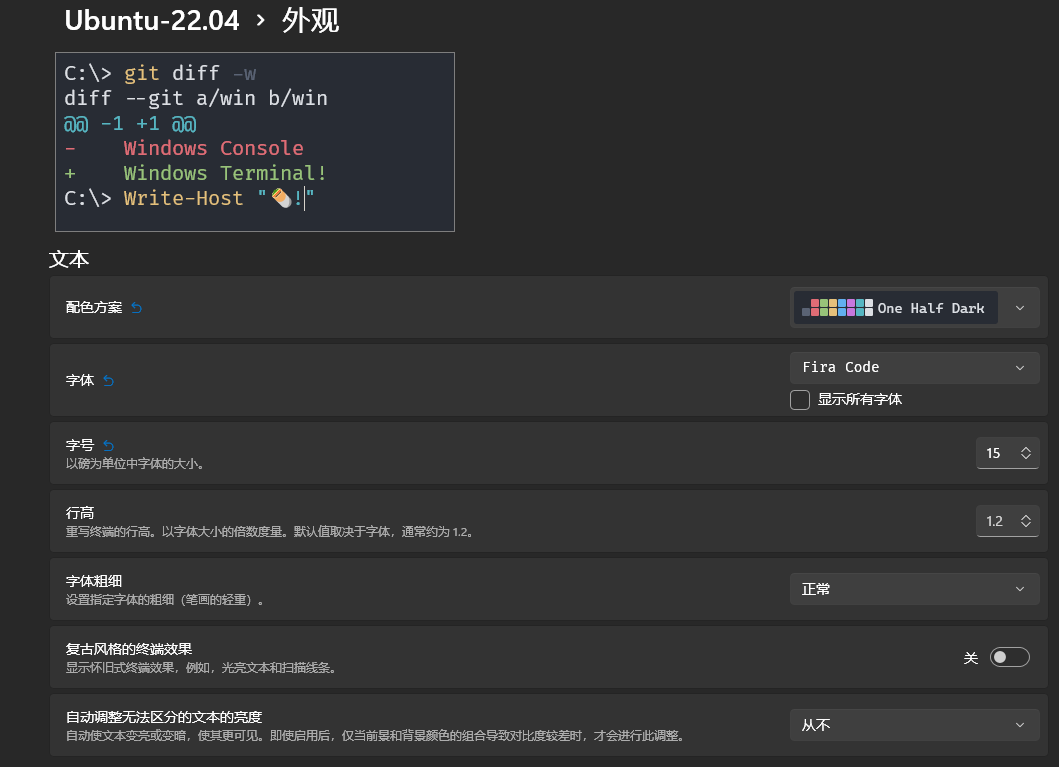
FiraCode 字体下载链接 并进行安装
在vscode的settings.json中设置字体
    "editor.fontFamily": "Fira Code", //设置的字体类型为 Fira Code
    "editor.fontLigatures": true, //这个控制是否启用字体连字,true启用,false不启用,这里选择启用
    "editor.fontSize": 15, //设置字体大小
    "editor.fontWeight": "normal", //这个设置字体粗细,可选normal,bold,"100"~"900"等,选择合适的就行
在终端配置我们的个性化设置
Shell 脚本显示天气和数字时钟
参考文章 Windows Terminal 美化(wsl2、zsh、天气、数字时钟、ASCII Logo、彩色动画)
代码如下:
#!/bin/bash

# NAME: now
# PATH: $HOME/bin
# DESC: Display current weather, calendar and time
# CALL: Called from terminal or ~/.bashrc
# DATE: Apr 6, 2017. Modified: May 24, 2019.

# UPDT: 2019-05-24 If Weather unavailable nicely formatted error message.

# NOTE: To display all available toilet fonts use this one-liner:
#       for i in ${TOILET_FONT_PATH:=/usr/share/figlet}/*.{t,f}lf; do j=${i##*/}; toilet -d "${i%/*}" -f "$j" "${j%.*}"; done

# Setup for 92 character wide terminal
DateColumn=34 # Default is 27 for 80 character line, 34 for 92 character line
TimeColumn=61 # Default is 49 for   "   "   "   "    61 "   "   "   "

# Replace Edmonton with your city name, GPS, etc. See: curl wttr.in/:help
curl wttr.in/Hangzhou?0 --silent --max-time 3 > /tmp/now-weather
# Timeout #. Increase for slow connection---^

readarray aWeather < /tmp/now-weather
rm -f /tmp/now-weather

# Was valid weather report found or an error message?
if [[ "${aWeather[0]}" == "Weather report:"* ]] ; then
    WeatherSuccess=true
    echo "${aWeather[@]}"
else
    WeatherSuccess=false
    echo "+============================+"
    echo "| Weather unavailable now!!! |"
    echo "| Check reason with command: |"
    echo "|                            |"
    echo "| curl wttr.in/Edmonton?0    |" # Replace Edmonton with your city
    echo "|   --silent --max-time 3    |"
    echo "+============================+"
    echo " "
fi
echo " "                # Pad blank lines for calendar & time to fit

#--------- DATE -------------------------------------------------------------

# calendar current month with today highlighted.
# colors 00=bright white, 31=red, 32=green, 33=yellow, 34=blue, 35=purple,
#        36=cyan, 37=white

tput sc                 # Save cursor position.
# Move up 9 lines
i=0
while [ $((++i)) -lt 10 ]; do tput cuu1; done

if [[ "$WeatherSuccess" == true ]] ; then
    # Depending on length of your city name and country name you will:
    #   1. Comment out next three lines of code. Uncomment fourth code line.
    #   2. Change subtraction value and set number of print spaces to match
    #      subtraction value. Then place comment on fourth code line.
    Column=$((DateColumn - 10))
    tput cuf $Column        # Move x column number
    # Blank out ", country" with x spaces
    printf "          "
else
    tput cuf $DateColumn    # Position to column 27 for date display
fi

# -h needed to turn off formating: https://askubuntu.com/questions/1013954/bash-substring-stringoffsetlength-error/1013960#1013960
cal > /tmp/terminal1
# -h not supported in Ubuntu 18.04. Use second answer: https://askubuntu.com/a/1028566/307523
tr -cd '\11\12\15\40\60-\136\140-\176' < /tmp/terminal1  > /tmp/terminal

CalLineCnt=1
Today=$(date +"%e")

printf "\033[32m"   # color green -- see list above.

while IFS= read -r Cal; do
    printf "%s" "$Cal"
    if [[ $CalLineCnt -gt 2 ]] ; then
        # See if today is on current line & invert background
        tput cub 22
        for (( j=0 ; j <= 18 ; j += 3 )) ; do
            Test=${Cal:$j:2}            # Current day on calendar line
            if [[ "$Test" == "$Today" ]] ; then
                printf "\033[7m"        # Reverse: [ 7 m
                printf "%s" "$Today"
                printf "\033[0m"        # Normal: [ 0 m
                printf "\033[32m"       # color green -- see list above.
                tput cuf 1
            else
                tput cuf 3
            fi
        done
    fi

    tput cud1               # Down one line
    tput cuf $DateColumn    # Move 27 columns right
    CalLineCnt=$((++CalLineCnt))
done < /tmp/terminal

printf "\033[00m"           # color -- bright white (default)
echo ""

tput rc                     # Restore saved cursor position.

#-------- TIME --------------------------------------------------------------

tput sc                 # Save cursor position.
# Move up 8 lines
i=0
while [ $((++i)) -lt 9 ]; do tput cuu1; done
tput cuf $TimeColumn    # Move 49 columns right

# Do we have the toilet package?
if hash toilet 2>/dev/null; then
    echo " $(date +"%I:%M %P") " | \
        toilet -f future --filter border > /tmp/terminal
# Do we have the figlet package?
elif hash figlet 2>/dev/null; then
#    echo $(date +"%I:%M %P") | figlet > /tmp/terminal
    date +"%I:%M %P" | figlet > /tmp/terminal
# else use standard font
else
#    echo $(date +"%I:%M %P") > /tmp/terminal
    date +"%I:%M %P" > /tmp/terminal
fi

while IFS= read -r Time; do
    printf "\033[01;36m"    # color cyan
    printf "%s" "$Time"
    tput cud1               # Up one line
    tput cuf $TimeColumn    # Move 49 columns right
done < /tmp/terminal

tput rc                     # Restore saved cursor position.

exit 0
需要安装依赖sudo apt install toilet和sudo apt install ncal
将脚本添加至~/.zshrc配置文件的末尾
# 配置文件
我们希望在 wsl2 中使用 windows 下的代理进行链接访问,其次我也遇到恶性 bug 就是 wsl2 每次启动都会创建 swap 分区,不会自动删除释放,再次启动后又会创建新的 swap 分区,防不胜防,一下子就把我的 c 盘塞满了,所以必须得整改整改了
打开%USERPROFILE%\.wslconfig文件,如果没有就创建一个.wslconfig,在其写入如下内容:
[wsl2]
swap=0
nestedVirtualization=true
ipv6=true
[experimental]
autoMemoryReclaim=gradual # gradual | dropcache | disabled
networkingMode=mirrored # 开启镜像网络 mirrored
dnsTunneling=true # 开启 DNS Tunneling
firewall=true # 开启 Windows 防火墙
autoProxy=true # 开启自动同步代理
sparseVhd=true # 开启自动释放 WSL2 虚拟硬盘空间
hostAddressLoopback=true
上述配置顺带实现了 wsl2 下直接使用 windows 的代理
然后运行 wsl --manage 发行版名字 --set-sparse true 启用稀疏 VHD 允许 WSL2 的硬盘空间自动回收,比如 wsl --manage Ubuntu-22.04 --set-sparse true
然后你会发现,WSL2 和 Windows 主机的网络互通而且 IP 地址相同了,还支持 IPv6 了,并且从外部(比如局域网)可以同时访问 WSL2 和 Windows 的网络。这波升级彻底带回以前 WSL1 那时候的无缝网络体验了,并且 Windows 防火墙也能过滤 WSL 里的包了,再也不需要什么桥接网卡、端口转发之类的操作了。并且 WSL2 的内存占用和硬盘空间都可以自动回收了!
另外,使用 VSCode - WSL 插件的,建议去 VSCode 设置里把自动端口转发关掉(Remote: Auto Forward Ports),避免冲突,因为 WSL2 更新之后新的网络已经是和你的 Windows 使用相同网络了,不再需要端口转发了。
最后,如果你在 WSL 里使用 docker,那需要将 autoMemoryReclaim 配置为 dropcache 或者 disabled,然后在 /etc/docker/daemon.json 里添加一句 “iptables”: false ,否则你可能无法正常使用 docker。
# python 环境配置
# python 软链接
新版的 Ubuntu 自带了 python,但是我们必须输入 python3 才能运行,有点麻烦,可以软链接修改一下
首先查看 python3 所在位置
whereis python3
之后进行软链接操作
sudo ln -s /usr/bin/python3 /usr/bin/python
之后就可以直接输入 python 进行运行了
# 使用 PPA 添加 Python 源
如果没有 python 的话,我们也可以通过使用 PPA 添加 Python 源
sudo add-apt-repository ppa:deadsnakes/ppa
sudo apt update
sudo apt install python3.x
# 进入 Poetry 的世界
之前介绍过常规的使用 conda 来进行 python 的包管理,不过对于自己的计算机而言,安装太多的 conda 环境,有点过于重了,这里对于我们自己使用的 WSL2 环境,可以使用轻量化的 Poetry
安装 poetry
curl -sSL https://install.python-poetry.org | python3 -
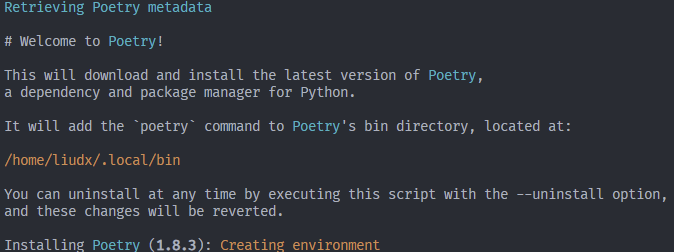
按提示将路径添加到 PATH 环境变量,export PATH=~/.local/bin:$PATH。
这里以.zshrc 为例,然后 source ~/.zshrc。这样就可以使用 poetry 命令了。
一般情况下,我会配置poetry config virtualenvs.in-project true。这样项目的环境安装的时候在项目根目录的.venv文件夹内。
# 中文字体显示
由于 WSL2 没有图形化界面,我们首先需要安装 GUI 后端tk
sudo apt-get install python3-tk
我们可以通过使用 Windows 自带字体的方式,来实现快速安装中文字体(以 Ubuntu 为例)
在命令行输入指令
sudo ln -s /mnt/c/Windows/Fonts /usr/share/fonts/font
我们只需要将 Windows 下的字体目录链接到 WSL 目录下即可然后再刷新一下
fc-cache -fv
刷新字体缓存。这里如果报错,安装 fontconfig 即可
sudo apt update
sudo apt install fontconfig
然后查看已安装的中文字体
fc-list :lang=zh
接下来打开 python,输入以下命令,打印 matplotlib 原来的字体缓存路径
import matplotlib as plt
print(plt.get_cachedir())
用 rm -r 删除这个路径,并增加下面的代码增加中文字体支持
plt.rcParams["font.sans-serif"] = ["SimHei"]
plt.rcParams["axes.unicode_minus"] = False
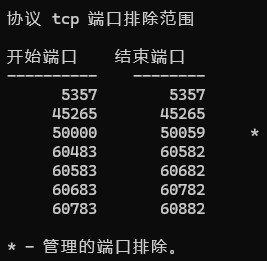
# 修改 Hyper-V 端口号
我们使用
netsh int ip show excludedportrange protocol=tcp
对 Hyper-V 占用的端口号查询,发现
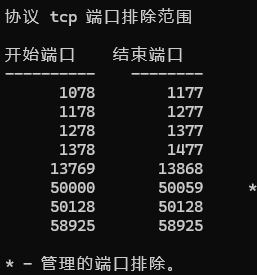
可能会出现占用比较常见的端口号,导致一些程序无法正常运行,比如我的 hugo
所以手动调整这些占用的端口号到不经常使用的位置:
netsh int ipv4 set dynamic tcp start=60001 num=5534
之后重启,就能看到最终效果了
大功告成
Debian 存储清理
# 旧内核清理
sudo apt purge $(dpkg -l 'linux-*' | awk '/^ii/{print $2}' | grep -P '^(?!linux-(?:generic|raspi|aws)).*')
# 旧软件清理
首先查看安装包缓存大小:sudo du -sh /var/cache/apt/archives
正式进行清理操作:
-
清理旧版本的软件缓存:
sudo apt-get autoclean -
清理所有软件缓存:
sudo apt-get clean -
清理系统中不再使用的孤立文件:
sudo apt-get autoremove可以使用
sudo du -sh /var/cache/apt命令查看缓存大小 -
清理软件的残余配置:
sudo apt-get autoremove -purge -
卸载软件:
sudo apt --purge remove xxx
sudo apt autoclean && sudo apt clean && sudo apt autoremove && sudo apt remove && sudo apt autoremove --purge
# 删除残余配置文件
remove 但没有 purge 的软件会残留一部分配置文件,这里做一个清除操作
-
找出系统上哪些软件包留下了残余的配置文件:
dpkg --list | grep "^rc" -
提取软件名:
dpkg --list | grep "^rc" | cut -d " " -f 3 -
删除软件包:
dpkg --list | grep "^rc" | cut -d " " -f 3 | xargs sudo dpkg --purge
# 清除无用依赖包
-
安装查看工具 deborphan:
sudo apt install deborphan -
执行软件名列出所有无用依赖:
deborphan -
删除软件:
deborphan | xargs sudo apt purge -y
# 清除过时软件
所谓过时(obsolete)的软件包是指 /etc/apt/sources.list 源文件中没有任何一个软件源提供这个软件的 deb 安装包
也就是说这个软件包在软件源里找不到了,不被支持了.这可能是因为下面几个原因:
- 上游开发者不维护这个软件,又没有人来接管这个软件的开发.所以 Debian/Ubuntu 的软件包维护人员决定将这个软件从软件源中删除
- 这个软件成了孤儿,同时用户很少.所以它就从软件源里消失了
- 这个软件有了一个新的名字,维护人员给它起了一个新的名字并保留旧软件包
-
查找所有过时软件:
sudo aptitude search ?obsolete -
可以手动删除,也可以清除所有:
sudo aptitude purge ~o
# 清理日志文
ncdu 工具可以查看文件大小
-
安装后执行:sudo ncdu /var/log
-
删除可以使用:sudo dd if=/dev/null of=/var/log/xxx.log
# 查看大软件
debian-goodies 工具可以查看软件大小,可以执行 dpigs -H 查看大容量软件,默认展示前十条结果,可以指定展示行数 dpigs -H –lines=20
1.1GiB elasticsearch
315MiB golang-1.18-go
228MiB openjdk-17-jdk-headless
183MiB openjdk-17-jre-headless
140MiB docker.io
105MiB libllvm14
102MiB golang-1.18-src
96MiB containerd
67MiB gcc-12
52MiB guile-3.0-libs
.............
docker 使用优化
可以参考这篇文章:wsl2 安装 docker 及解决内存占用过大问题
异常处理
-
snap 安装软件后无法使用,需要手动添加环境变量
在
~/.zshrc中添加以下指令:export PATH=$PATH:/snap/bin -
\\wsl.localhost无法访问在地址栏输入:
\\wsl.localhost或者\\wsl.localhost\实际原因:由 Window10 升级到 Windows11 的系统,在注册表
HKEY_LOCAL_MACHINE\SYSTEM\CurrentControlSet\Control\NetworkProvider\Order和\HKEY_LOCAL_MACHINE\SYSTEM\CurrentControlSet\Control\NetworkProvider\HwOrder两个键值中 ProviderOrder 的值为 cbfs6,P9NP,RDPNP,LanmanWorkstation,webclient. 而在 Windows11 中,WSL 的文件访问方式已经全面启用了 P9NP,并且若是全新安装的系统,默认就没有 cbfs6 这个参数.所以只要删除这个参数,并保持 P9NP 处于开头的位置即可.随后重启系统就可以正常访问了.即
P9NP,RDPNP,LanmanWorkstation,webclient