
 Introduction
WSL2 (Windows Subsystem for Linux 2) is a Linux subsystem provided by Microsoft on Windows, allowing you to run Linux programs on Windows with performance slightly better than the Windows host itself. According to tests from a foreign website, WSL2 can achieve over 90% of native Linux performance. It is a great option for daily work or study, allowing you to perform tasks like programming, server setup, and more while enjoying the excellent graphical interface of Windows.
Installation
# Basic Installation
If you’re a Windows 11 user, the environment already supports WSL2, so you can install it directly.
- Run
wsl --updateto check for updates. - Download the
Ubuntusystem from the Microsoft Store. - Find the downloaded
Ubuntuin the Start menu. - Run
wsl -l -vto check the installed system.
# Moving WSL2 from C: Drive
Here’s an example using Ubuntu-22.04:
-
Run PowerShell as an administrator and execute:
wsl -l -v -
Stop any running WSL instances:
wsl --shutdown -
Export the Linux system you want to move:
wsl --export Ubuntu D:/ubuntu.tar -
Uninstall the original Linux instance:
wsl --unregister Ubuntu -
Import the exported file to the desired location:
wsl --import Ubuntu-22.04 D:\ubuntu\ D:\ubuntu.tar --version 2 -
Set the default user:
ubuntu.exe config --default-user <username>For
ubuntu-22.04, useubuntu2204.exe.
Configuration
# Personalization
To personalize your terminal, you can install and configure oh-my-zsh:
# Update packages
sudo apt update && sudo apt upgrade

# Install zsh
sudo apt install zsh -y

# Install oh-my-zsh
sh -c "$(curl -fsSL https://raw.github.com/robbyrussell/oh-my-zsh/master/tools/install.sh)"

# Install command completion and syntax highlighting plugins
git clone https://github.com/zsh-users/zsh-syntax-highlighting.git ${ZSH_CUSTOM:-~/.oh-my-zsh/custom}/plugins/zsh-syntax-highlighting
git clone https://github.com/zsh-users/zsh-autosuggestions ${ZSH_CUSTOM:-~/.oh-my-zsh/custom}/plugins/zsh-autosuggestions
git clone https://github.com/esc/conda-zsh-completion ${ZSH_CUSTOM:-~/.oh-my-zsh/custom}/plugins/conda-zsh-completion
sed -i 's/plugins=(git)/plugins=(git z sudo pip ufw docker docker-compose extract command-not-found zsh-autosuggestions zsh-syntax-highlighting conda-zsh-completion poetry)/g' ~/.zshrc

# Set zsh as the default shell
chsh -s /bin/zsh
Relevant plugins can be enabled in the .zshrc file:
plugins=(
git
z
sudo
pip
ufw
docker
docker-compose
extract
command-not-found
zsh-autosuggestions
zsh-syntax-highlighting
conda-zsh-completion
poetry
)
Run source .zshrc to apply the configuration.
FiraCode Font Download Link and install it.
Set the font in vscode’s settings.json:
"editor.fontFamily": "Fira Code",
"editor.fontLigatures": true,
"editor.fontSize": 15,
"editor.fontWeight": "normal",
You can also configure the terminal for a personalized experience:
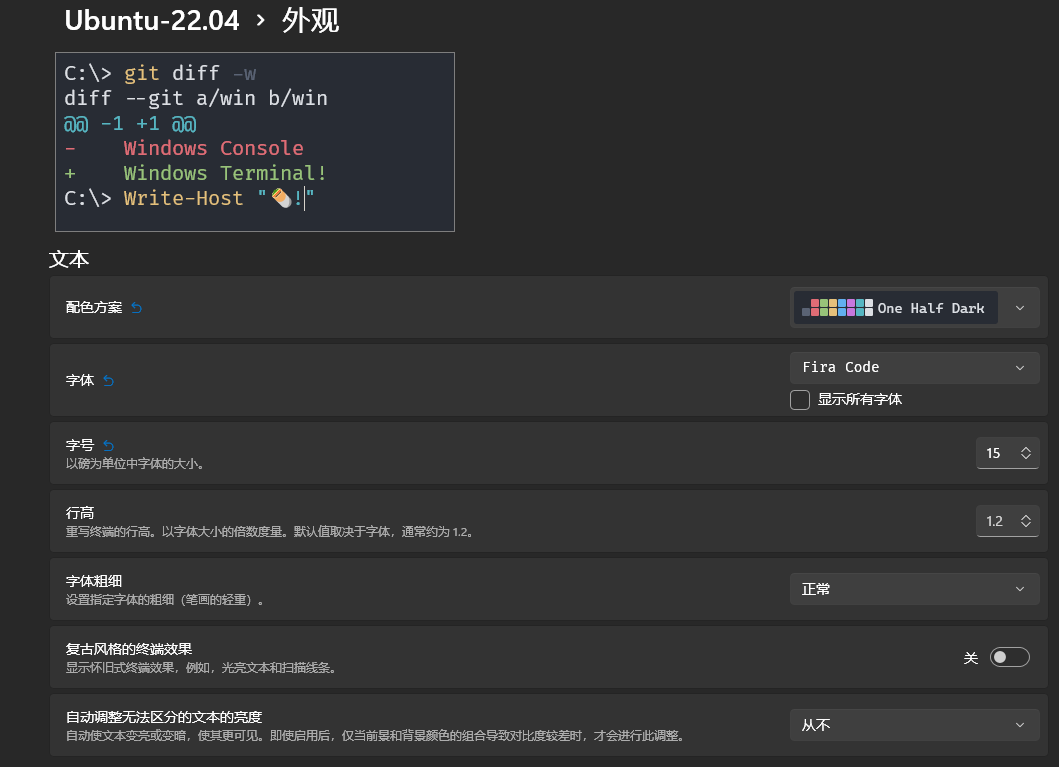
For a weather display and digital clock in your terminal, refer to this guide: Windows Terminal Customization (WSL2, Zsh, Weather, Digital Clock, ASCII Logo, Colored Animations) .
Here’s the shell script for it:
#!/bin/bash

# NAME: now
# PATH: $HOME/bin
# DESC: Display current weather, calendar and time
# CALL: Called from terminal or ~/.bashrc
# DATE: Apr 6, 2017. Modified: May 24, 2019.

# UPDT: 2019-05-24 If Weather unavailable nicely formatted error message.

# NOTE: To display all available toilet fonts use this one-liner:
#       for i in ${TOILET_FONT_PATH:=/usr/share/figlet}/*.{t,f}lf; do j=${i##*/}; toilet -d "${i%/*}" -f "$j" "${j%.*}"; done

# Setup for 92 character wide terminal
DateColumn=34 # Default is 27 for 80 character line, 34 for 92 character line
TimeColumn=61 # Default is 49 for   "   "   "   "    61 "   "   "   "

# Replace Edmonton with your city name, GPS, etc. See: curl wttr.in/:help
curl wttr.in/Hangzhou?0 --silent --max-time 3 > /tmp/now-weather
# Timeout #. Increase for slow connection---^

readarray aWeather < /tmp/now-weather
rm -f /tmp/now-weather

# Was valid weather report found or an error message?
if [[ "${aWeather[0]}" == "Weather report:"* ]] ; then
    WeatherSuccess=true
    echo "${aWeather[@]}"
else
    WeatherSuccess=false
    echo "+============================+"
    echo "| Weather unavailable now!!! |"
    echo "| Check reason with command: |"
    echo "|                            |"
    echo "| curl wttr.in/Edmonton?0    |" # Replace Edmonton with your city
    echo "|   --silent --max-time 3    |"
    echo "+============================+"
    echo " "
fi
echo " "                # Pad blank lines for calendar & time to fit

#--------- DATE -------------------------------------------------------------

# calendar current month with today highlighted.
# colors 00=bright white, 31=red, 32=green, 33=yellow, 34=blue, 35=purple,
#        36=cyan, 37=white

tput sc                 # Save cursor position.
# Move up 9 lines
i=0
while [ $((++i)) -lt 10 ]; do tput cuu1; done

if [[ "$WeatherSuccess" == true ]] ; then
    # Depending on length of your city name and country name you will:
    #   1. Comment out next three lines of code. Uncomment fourth code line.
    #   2. Change subtraction value and set number of print spaces to match
    #      subtraction value. Then place comment on fourth code line.
    Column=$((DateColumn - 10))
    tput cuf $Column        # Move x column number
    # Blank out ", country" with x spaces
    printf "          "
else
    tput cuf $DateColumn    # Position to column 27 for date display
fi

# -h needed to turn off formating: https://askubuntu.com/questions/1013954/bash-substring-stringoffsetlength-error/1013960#1013960
cal > /tmp/terminal1
# -h not supported in Ubuntu 18.04. Use second answer: https://askubuntu.com/a/1028566/307523
tr -cd '\11\12\15\40\60-\136\140-\176' < /tmp/terminal1  > /tmp/terminal

CalLineCnt=1
Today=$(date +"%e")

printf "\033[32m"   # color green -- see list above.

while IFS= read -r Cal; do
    printf "%s" "$Cal"
    if [[ $CalLineCnt -gt 2 ]] ; then
        # See if today is on current line & invert background
        tput cub 22
        for (( j=0 ; j <= 18 ; j += 3 )) ; do
            Test=${Cal:$j:2}            # Current day on calendar line
            if [[ "$Test" == "$Today" ]] ; then
                printf "\033[7m"        # Reverse: [ 7 m
                printf "%s" "$Today"
                printf "\033[0m"        # Normal: [ 0 m
                printf "\033[32m"       # color green -- see list above.
                tput cuf 1
            else
                tput cuf 3
            fi
        done
    fi

    tput cud1               # Down one line
    tput cuf $DateColumn    # Move 27 columns right
    CalLineCnt=$((++CalLineCnt))
done < /tmp/terminal

printf "\033[00m"           # color -- bright white (default)
echo ""

tput rc                     # Restore saved cursor position.

#-------- TIME --------------------------------------------------------------

tput sc                 # Save cursor position.
# Move up 8 lines
i=0
while [ $((++i)) -lt 9 ]; do tput cuu1; done
tput cuf $TimeColumn    # Move 49 columns right

# Do we have the toilet package?
if hash toilet 2>/dev/null; then
    echo " $(date +"%I:%M %P") " | \
        toilet -f future --filter border > /tmp/terminal
# Do we have the figlet package?
elif hash figlet 2>/dev/null; then
#    echo $(date +"%I:%M %P") | figlet > /tmp/terminal
    date +"%I:%M %P" | figlet > /tmp/terminal
# else use standard font
else
#    echo $(date +"%I:%M %P") > /tmp/terminal
    date +"%I:%M %P" > /tmp/terminal
fi

while IFS= read -r Time; do
    printf "\033[01;36m"    # color cyan
    printf "%s" "$Time"
    tput cud1               # Up one line
    tput cuf $TimeColumn    # Move 49 columns right
done < /tmp/terminal

tput rc                     # Restore saved cursor position.

exit 0
Ensure dependencies like toilet and ncal are installed with:
sudo apt install toilet ncal
Add the script to the end of your ~/.zshrc file for automatic execution.
# WSL2 Configuration
For optimal use of WSL2, especially with Windows proxy settings and preventing automatic swap file creation, create a .wslconfig file in %USERPROFILE%:
[wsl2]
swap=0
nestedVirtualization=true
ipv6=true

[experimental]
autoMemoryReclaim=gradual
networkingMode=mirrored
dnsTunneling=true
firewall=true
autoProxy=true
sparseVhd=true
hostAddressLoopback=true
Run wsl --manage <DistroName> --set-sparse true to enable sparse VHD, freeing up space automatically. This configuration improves networking, allows memory and disk space to be automatically reclaimed, and integrates the Windows firewall.
For Docker users, set autoMemoryReclaim to dropcache or disabled, and add "iptables": false to /etc/docker/daemon.json for proper functionality.
# Python Environment Setup
# Python Symbolic Link
Ubuntu typically comes with Python pre-installed, but it requires the use of python3. You can create a symbolic link to make python point to python3:
whereis python3
sudo ln -s /usr/bin/python3 /usr/bin/python
# Adding Python via PPA
If Python is not installed, add the Python source via PPA:
sudo add-apt-repository ppa:deadsnakes/ppa
sudo apt update
sudo apt install python3.x
# Using Poetry for Python Package Management
Install Poetry:
curl -sSL https://install.python-poetry.org | python3 -
Add the Poetry path to your environment by editing .zshrc and running source ~/.zshrc. Configure Poetry to create virtual environments in the project directory:
poetry config virtualenvs.in-project true
# Changing Hyper-V Port Range
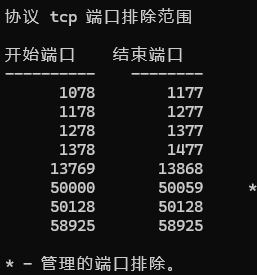
To resolve port conflicts with Hyper-V, check the current port range:
netsh int ip show excludedportrange protocol=tcp
You may find that some commonly used ports are reserved, which can prevent certain applications from running properly, like my Hugo server.
To manually reassign these reserved ports to a less frequently used range, use the following command:
netsh int ipv4 set dynamic tcp start=60001 num=5534
After a restart, you should see the updated port allocation.
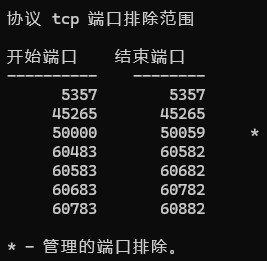
Success!
Cleaning Up Debian Storage
# Cleaning Up Old Kernels
Run the following to purge old kernels:
sudo apt purge $(dpkg -l 'linux-_' | awk '/^ii/{print $2}' | grep -P '^(?!linux-(?:generic|raspi|aws))._')
# Cleaning Up Old Software Packages
Start by checking the cache size of installed packages:
sudo du -sh /var/cache/apt/archives
Proceed with the cleanup:
-
Clear the cache of older versions of packages:
sudo apt-get autoclean -
Clear all package cache:
sudo apt-get clean -
Remove unused files:
sudo apt-get autoremoveYou can verify the cache size again using:
sudo du -sh /var/cache/apt -
Remove residual configuration files of uninstalled packages:
sudo apt-get autoremove --purge -
Uninstall specific software:
sudo apt --purge remove <package_name>
Run the following combined command for an all-in-one cleanup:
sudo apt autoclean && sudo apt clean && sudo apt autoremove && sudo apt remove && sudo apt autoremove --purge
# Deleting Residual Configuration Files
If you removed software without using the purge option, residual configuration files might be left behind. To clean these up:
Identify packages with residual configuration files: dpkg --list | grep "^rc"
Extract package names: dpkg --list | grep "^rc" | cut -d " " -f 3
Purge the packages: dpkg --list | grep "^rc" | cut -d " " -f 3 | xargs sudo dpkg --purge
# Removing Unused Dependencies
Install deborphan, a tool for finding orphaned packages:sudo apt install deborphan
List all orphaned dependencies: deborphan
Remove orphaned packages: deborphan | xargs sudo apt purge -y
# Removing Obsolete Packages
Obsolete packages are those that are no longer provided by any of the repositories listed in /etc/apt/sources.list. Reasons for this include:
- The software is no longer maintained, and no one has taken over development.
- The software has become less popular, and the package was removed from the repository.
- The software has been renamed, and the old package name is no longer supported.
-
To find all obsolete packages:
sudo aptitude search ?obsolete -
You can remove them manually or use:
sudo aptitude purge ~o
# Cleaning Up Log Files
You can use the ncdu tool to check the file sizes in your system:
- After installing it, run:
sudo ncdu /var/log - To delete a specific log file, use:
sudo dd if=/dev/null of=/var/log/<log_file>
# Finding Large Installed Packages
The debian-goodies package contains a tool to check the size of installed packages. You can use dpigs -H to list the largest packages:dpigs -H
By default, it shows the top 10 results. You can specify the number of lines to display with:dpigs -H --lines=20
For example:
1.1GiB elasticsearch
315MiB golang-1.18-go
228MiB openjdk-17-jdk-headless
183MiB openjdk-17-jre-headless
140MiB docker.io
105MiB libllvm14
102MiB golang-1.18-src
96MiB containerd
67MiB gcc-12
52MiB guile-3.0-libs
...
# Optimizing Docker Usage
You can refer to this article for tips on installing Docker on WSL2 and resolving memory usage issues: Install Docker on WSL2 and Optimize Memory Usage
Troubleshooting
-
After installing a program with snap, it might not be recognized. You can manually add the environment variable in
~/.zshrc:export PATH=$PATH:/snap/bin -
If you cannot access
\\wsl.localhost, enter either\\wsl.localhostor\\wsl.localhost\in the address bar.Cause: When upgrading from Windows 10 to Windows 11, the registry keys
HKEY_LOCAL_MACHINE\SYSTEM\CurrentControlSet\Control\NetworkProvider\OrderandHKEY_LOCAL_MACHINE\SYSTEM\CurrentControlSet\Control\NetworkProvider\HwOrdermay include the valuecbfs6in ProviderOrder. Windows 11 has fully adopted P9NP for WSL file access, and clean installs of Windows 11 don’t includecbfs6by default. Simply remove thecbfs6value and ensureP9NPis at the beginning of the string. After a system reboot, WSL should be accessible again.The correct value should be:
P9NP,RDPNP,LanmanWorkstation,webclient